How to Polish Concrete Countertops Like A Pro

Countertops constructed with concrete do not only belong in industrial kitchens. They have become the favorite because they are modern and stylish to pick by homeowners. When polished, they turn from plain gray slabs into sleek surfaces that shine.
Why do people love them? First, they look amazing. A polished surface adds depth, light reflection, and a custom feel.
Second, they are tough. Well-finished, sealed concrete does not scratched, overheat or wear out with everyday use.
Lastly, each work may be tailored. You control the level of shine, the color, and even how much of the stone aggregate shows.
This article walks you through the entire process. We are going to discuss what tools you will require and step by step polishing.
Nevertheless, we shall discuss the process of sealing, and maintaining the finish. By conclusion, you will be polishing concrete countertops almost as Professional.


Contents
Understanding Polished Concrete Countertops

Polishing is more than being shiny. It strengthens and smooth the surface and provides many years of wear. Just imagine it is the soft cement paste being turned into a stone-like finish.
It’s important to separate grinding from polishing. Grinding is the heavy cutting stage. It takes away the top surface and reveals rocks such as pebbles or sands. On the contrary, polishing employs more refined pads in the process of refining the surface and imparting a gloss.
You also need to know finish levels:
- Cast finish – This is matte. It keeps the natural cement look with no aggregate showing.
- Light polish – Here, fine sands peek through. The surface is smooth but not glossy.
- Ground finish – This reveals aggregates like granite chips. It creates a terrazzo-like look.
The finish you pick decides how many grits you’ll go through, the sealer type, and the final appearance.
When & Why to Polish Concrete Countertops

Timing is key. For wet polishing, many pros start 1–3 days after the countertop has set. This works if you want to grind and expose aggregate early. If you only want a light polish, you can wait until the concrete cures fully.
So, why polish at all?
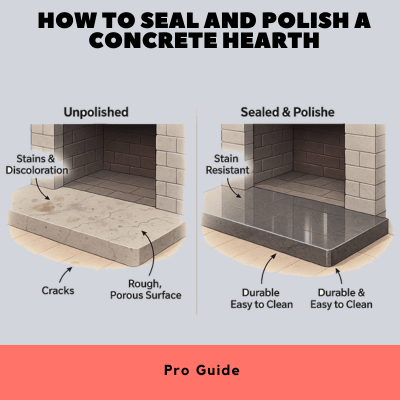
- It enhances appearance. A dull gray block becomes glossy and reflective.
- It improves hardness. With densifiers, the paste gets stronger.
- It prepares the surface for sealing. A sealed polished surface resists stains.
Remember, polishing is not sealing. Polishing makes it strong and smooth. Sealing adds chemical and stain resistance. You need both for the best results.
Tools & Materials You’ll Need

Polishing requires specific tools. Here’s your checklist.
Equipment:
- A variable-speed wet/dry polisher. Ideally with a water feed to reduce dust.
- Diamond polishing pads, ranging from 50 grit to 3000 grit.
- Backer pads. Use rigid ones for flat areas and flexible ones for edges.
Consumables:
- Grout or slurry for filling pinholes.
- Densifiers, either lithium, sodium, or potassium-based.
- Sealers, either penetrating or coating types.
Safety Gear:
- Use GFCI (Ground Fault Circuit Interrupter) outlet.
- Rubber gloves, goggles, respirator or dust mask.
- Ear protection, apron, and waterproof boots.
The appropriate equipment makes the work safe and hassle-free.
Step-by-Step Polishing Process

Now let’s break down the polishing into clear steps.
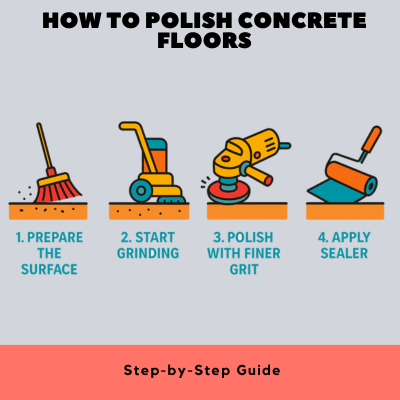
A. Preparation
First, elevate your countertop. Place it on foam blocks or a stable platform. Guard against water spray and slurry on the floor and walls. Set up good drainage if you are wet polishing. Make sure your water feed is consistent.
B. Initial Grinding
If you want aggregate to show, start with 30–60 grit pads. Move the polisher in slow circles. Keep the pad flat and let the machine’s weight do the work. Grind evenly until aggregates show at the same depth. Always rinse the slurry out to a smaller grit.
C. Honing Stage
Next, move to 100–200 grit pads. This step flattens and eliminates deep grooves of rough grinding. Use a densifier at an approximate 200 grit. This chemical strengthens the surface that enhances the cement paste more resistant to wear.
D. Polishing Sequence
Now the real polishing begins. Work through 400 to 800 to 1500 to 3000 grits. The marks of each grit absorb the marks of the one before it. Never skip a grit, or scratches will remain. Keep the polisher moving in circles. Avoid pressing down.
E. Filling Holes with Slurry
At about 400 grits, mix a slurry from cement and color pigment if needed. Apply it to fill tiny pinholes and voids. Let it dry overnight. Then, continue polishing with 800 grit or higher. The mixture of the slurry covers flaws and integrates with the surface.
F. Final Polish & Finish
The surface becomes like mirror at 1500 to 3000 grits. You can just stop at 200 grits instead when you intend to apply a topical sealer. For a natural glossy look, polish all the way to 3000 grits with a densifier applied.
Sealing the Countertop

Sealing is critical while polishing a concrete counter top. It offers protection to the polished concrete against stains, oils and acids.
Penetrating sealers are absorbed into concrete. They maintain the natural husky or shinny appearance. They work best with high-grit finishes.
Topical sealers make a coating on the surface. These are resistant to stains and chemicals, which makes them a good fit to the kitchens. However, polishing has to cease at about 200 grit to allow them to bond. Examples of such would be acrylics, urethanes and hybrid sealers.
How to apply? Use thin coats. Let each coat cure as directed. To provide extra gloss, then add a top polish like some polish enhancer or a layer of wax.
Post-Polishing Care & Maintenance

The countertop will ensure many years with proper polishing and sealing. But care matters.
- A cleaner with neutral pH is best for routine cleaning.
- Acidic cleaners i.e., lemon etc are harmful. They can etch the surface. Brands like Simple Green work well.
- Furniture polish can rejuvenate the shine with a lightning-fast polish.
- Use always cutting boards and trivets. Put the coasters under drinks. Clean the spills right away, especially if it is wine, oil or acidic liquids.
- Seal each 1 to 2 years depending on usage or you can reseal upon dull appearance.
Troubleshooting & Expert Tips

Even cautious polishing can cause problems. However, most of the issues are fixable if you exactly know the solution.
- Uneven shine: A bumpy shine may be an indicator that a grit step was not carefully taken or that the step was rushed. It also occurs occasionally when you have polished one area longer than the rest. Stroke backwards one or two grits, reshape in a straight line, and continue on up the process.
- Surface scratches: The other common problem is surface scratches. They normally occur when the polisher is moved too fast or when there is uneven pressure. When this occurs, go slow, wipe your pads, and resume the proper grit.
- Stains despite polishing: Stains even after polishing normally indicate failure of sealer. Polishing will not prevent the leaves of oils, wine, or lemon juice. In case of spots that do not clean, remove the weak sealer and apply the stronger type of coating.
- Pinholes and air bubbles: They may appear during polishing. Particularly they appear when the concrete mix was not well vibrated. A solution to this is to apply a cement-based slurry or filler with approximately 400 grits. Paint it, leave it to dry and polish over.
- Cloudy or hazy finish after sealing: Finish after sealing appears to be cloudy or hazy, unless the surface was dry when the sealer was added. To repair, completely strip the sealer, allow the concrete to dry and apply again in a thin and even layer.
- Edge polishing problems: These are very common to beginners. The flat is simpler, but edges and corners tend to appear dull or rough. The answer here is to replace with smaller flexible pads or to use a hand polisher that is designed to work on edges.
Pro tips from experts:
- Grits should not be left out, however alluring it may be.
- When it is wet polishing always keep the water flowing steadily.
- Filling dry or filling pads with slurry may scald the surface and leave streaks.
Pros & Cons of DIY vs Professional Polishing

DIY polishing is possible. The benefits? You save money and gain the satisfaction of doing it yourself. You also learn valuable skills.
But DIY has challenges. The learning curve is steep. The learning curve is steep. Errors such as a grit being overlooked can spoil finish. Equipment rental costs can add up.
Hiring a pro gives you precision. They carry with them industrial tools, experience and usually a warranty. Big kitchens, built-in sinks, or complicated forms are not to be taken on home guy.
So, weigh your options. DIY works for small, simple counters. For big projects, professional polishing is worth it.
Conclusion
Polished concrete counter tops are attractive and workable. They are tough to scratches, heat and stains. They are also known to add slick and smart appearance to any kitchen of bathroom.
It is a very simple formula: adhere to the grit, use a densifier, seal well and mind the surface. Get it right and your counters will be shiny years to come.
Feeling like doing it yourself, then this guide has gotten you the motivation. Otherwise, you will have a clue about what to anticipate by employing a pros. In any case, polished concrete countertop is an intelligent during sourced decision.


Leave A Comment