How to Seal and Polish a Concrete Hearth: Pro Guide
The solid base, which is before your fireplace, is called a concrete hearth. It keeps your floor safe against heat, sparks, and embers. But bare concrete is porous. It takes up stains without being sealed or polished, cracks easily in the heat, and wears out easily.
Soot, ash, and spills over time create some dark marks. Over time, soot, ash, and spills leave dark marks. Water damage and thermal stress can also weaken the surface. In some cases, this even creates safety hazards.
Sealing and polishing solve these problems. A good sealer must provide a surface that solves problems. tough, not overwhelmed by numerous stains, and simply easy to clean. Polish makes it shine and look better. It makes it safer, as the entire rugged surface is rendered smoother.
Pen by pen, plank by plank, in this guide, you will realize how to seal and polish a concrete step in a hearth. We’ll cover the right sealers, tools, and polishing techniques. You’ll also get pro tips to avoid costly mistakes and keep your heart looking new.


Contents
Why Sealing & Polishing a Concrete Hearth Matters

Concrete is tough and yet not immutable. A hearth is subjected to harsh conditions. There is high heat, soot, grease, and passing people. So, the first thing to do is to seal and polish.
Heat resistance: Temperature swings do not crack a sealed surface. In the case of wood- and gas-burning fireplaces, this is a necessity. It also enhances the life of the fire by reducing stress induced by heating or cooling sequences of a fire.
Stain protection: The soot, ash, and grease are easier to wipe off on a sealed concrete surface. You will not require severe chemicals. That way, maintenance is less time-consuming. The surface itself remains fresh over the years.
Durability: Sealers prevent the wear of shoes and items in the fireplace. It is also used to clean brushes. They also preserve chips and surface erosion, which would happen with repeated use.
Safety & compliance: Nevertheless, joints are supposed to be appropriately closed. So that smoke and tiny embers should never escape. This lessens fire risks. It also places the fireplace in accordance with the building codes.
Aesthetic value: An ilmenite is good-looking. It gives a better look to the room; be it matte, satin, or glossy. The finish can likewise be made to suit other aspects of the design in the space.
Cost savings: There are no cracks and stains that will end up becoming expensive to repair. Neither are they expensive to replace in the future. Major costs incurred in repairs will be avoided in the future by investing in sealing.
Simply melt it, in other words, seal and polish, and you protect your investment. They make the fireplace more secure and pleasant to operate as well.
Choosing the Right Sealer for a Concrete Hearth

Not all sealers work for fireplaces. So, you need products that resist heat, stains, and daily wear. Here are some sealers listed that are suitable for concrete hearths.
Types of Sealers
There are mainly three types of sealers such as
- Penetrating sealers. These soak into concrete. Common silicates, silanes, and siloxanes. They are airy and transparent and are therefore not moisture traps.
- Film-forming sealers. These sealers create a surface layer. It can be acrylic, epoxy, polyurethane, or urethane. They are glossy and durable.
- Hybrid sealers. Newer water-based urethane blends combine breathability with a subtle sheen.
Best Sealers for Hearths
For high heat and good looks, consider these best-suited sealers:
- Professional option: Omega Sealer. It resists stains, UV, and heat. Best option when you require a long-life expectancy.
- DIY option: Ovation Sealer. Aqueous, food-grade, and easily applied. Best when it is an initial project.
- Other alternatives: Ghostshield, XS-327, or topical acrylic apply equally well to inside hearths.
Key Factors in Selection
The following facts should be remembered when you are establishing a sealer.
- Heat rating: The sealers should never be less than 500°F-rated. This means that they are capable of working with the intense heat without breaking or discolouring.
- Indoor vs. outdoor: The hearths in the open-air need UV and waterproofing. In its absence, the sealer can be peeled off or destroyed in the harshest environment.
- Finish: You get to choose a matte, satin or a shiny finish. The shiny face, however, appears smooth and it becomes dusty very fast.
- Budget & skill level: There are professional-grade sealers. They are difficult to apply without expertise.
The more tolerant DIY-friendly products aren’t as durable in hearths, where they’re in high demand.
Tools & Materials You’ll Need

Each tool has its own purpose in the polishing process of concrete hearths. So, before starting, gather everything you would require. This wastes less time and eliminates errors. Here are some important tools and materials.
- Microfiber brushes, foam rollers and pads.
- Diamond polishing pads (400-800 grits) or orbital sander.
- Repair epoxy, cracked (high-heat rated).
- Vacuums, degreasers, and pH-neutral cleaners are used in industries.
- Tape and drop cloths are used by painters.
Eyewear protection, respirator, and gloves. With the proper equipment, it will be much easier to seal and polish.
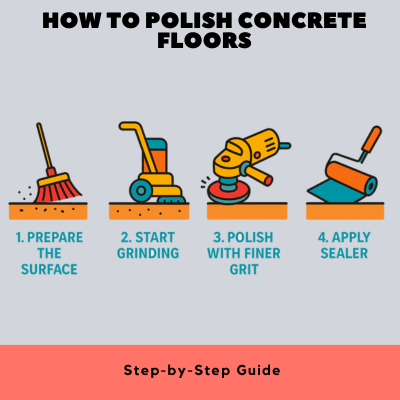
Step-by-Step Guide: How to Seal & Polish a Concrete Hearth

These comprise a few of the steps that will be taken to ensure the best results. Detailed steps are as below:
Step 1: Inspect & Repair
- Test the cracks, chips, and lumps.
- Looking for a bigger than 1/8-inch crack repair of high-heat epoxy.
- Let repairs cure fully before moving forward.
Step 2: Deep Clean
Clean the hearth thoroughly.
- Clean the hearth thoroughly.
- Clean with a degreaser.
- Scrub/pressure wash on low.
The liquid beneath the sealer would cause the peeling of the product in the future.
Step 3: Smooth the Surface
- Sand down rough patches.
- At first, apply 80-grit, followed by 120-grit.
- Clean with a cloth having some water on it and wipe off the dust.
Even bonded sealer is achieved by having a smooth surface.
Step 4: Apply the Sealer
Now apply the chosen sealer.
- Thin even coats with a roller or a brush.
- Please use 2-4 hours to dry between coats.
- Add a second coating to give an additional layer of protection.
Avoid puddles or streaks. Thin coats perform better.
Step 5: Polish for Shine & Slip Resistance
After sealing, polish the surface.
- Use diamond pads, moving from 400 to 800 grit.
- For satin, stop at 800–1500 grit.
- For glossy, continue to 1500+ grit.
Polishing not only adds shine. It also improves slip resistance.
Step 6: Cure & Test
- Let the sealer cure for 72 hours. When that time comes, do not use the fire.
- Perform a water bead test. The drops must be on the surface.
- Re-sealing of the plan every 1-2 years (use-dependent).
Maintenance & Long-Term Care Tips

A closed fireplace is not that expensive to maintain.
- Wash with weak soap and water. Avoid harsh chemicals.
- Reapply sealer every 12–24 months.
- The forging can be intensive. This is why it may be necessary to seal off the fireplace every year.
- Prevent scratches. Do not drag metal tools on the surface.
- Clean the soot and grease immediately.
This is because these little things can prolong your fire.
Common Mistakes to Avoid

Most DIY projects also fail because of avoidable mistakes. Here are some common mistakes that we can avoid during polishing the concrete hearth.
- Using the wrong sealer. Some sealers cannot face heat. They peel or discolor.
- Skipping crack repairs. Sealers won’t fix damage. The first one is to repair the cracks.
- Applying too thick a coat. Coats of thickness bubble, peel, and finish unevenly.
- Not allowing cure time. Soon use of the fireplace destroys the sealer.
All differences are in patience and the right materials.
FAQs
How often should you reseal a concrete hearth?
Every 12–24 months. Heavy use may require annual resealing.
Can I use countertop sealers on a hearth?
Not always. Countertop products may not withstand high heat. Always check the heat rating.
What finish is best—matte or glossy?
It depends on style. Matte looks natural. Glossy adds shine but shows dust. Satin is a balanced option.
Is DIY sealing as good as professional?
Yes, if you follow the steps carefully. But pros may achieve a more consistent finish with advanced tools.
How much does sealing a hearth cost?
DIY costs $50–$150 for materials. Professional sealing runs $300–$600, depending on size.
Conclusion
A concrete hearth is sealed and polished to shield against heat, stains, and wear. It also renders the fireplace safer as well as more appealing.
It features three tools and a technique that you can use with the right sealer to work on this type of project. The step-by-step approach is easy as long as you take your time.
Smoking piles of wood will last ages, and you will avoid many of the pitfalls. Cleaned and resealed so that it looks fresh. Glossy or matte, a polished hearth will be a permanent decorative feature in your house.
Invest in quality products. Maintain your hearth yearly. And have a safe, durable, beautiful fireplace.


Leave A Comment