Polish Stained Concrete Floors Like a Pro (DIY Guide)

Stained concrete floors are favorable since they have both strength and beauty. They are durable, remain easy to maintain. They have a high-end appearance at a cheaper price than tile or marble.
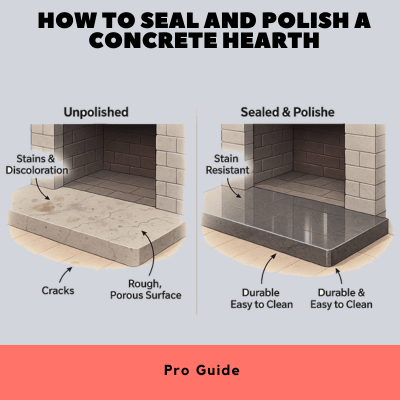
One should realize the difference between cleaning and polishing. Cleaning is just the act of removing the superficial dirt. While polishing enhances the luster and hardens the surface and stain resistance.
No guide will not tell you all. You will get to know tools, polishing method step-by-step and tips on special care. We will explore professional or DIY options as well as how to keep your floor fresh so it always looks.


Contents
Understanding Stained Concrete Floors

Stained concrete is different from ordinary concrete. It has color, pattern, and personality.
- Acid-based stains: These stains penetrate deep into the concrete. They chemically react with minerals. They create unique, marbled, and natural tones that will not peel or chip.
The downside is that they require careful cleaning. The strong alkaline products can damage their effect.
- Water-based stains: These are more surface-nearer and more adaptable stains. They have brighter color reds, blues or greens. Their application is more straightforward. They request more frequent resealing in order to maintain vibrancy.
Polishing stained concrete is important. It improves the appearance and provides additional security. Unpolished stained floors may appear drab and may also wear out quicker.
Tools & Materials Needed

Following is a detailed list for tools required during polishing stained concrete floors.
Basic Tools
- Broom and dustpan: This is used to remove dirt and debris and then polish afterwards. Clean surface washes off grit that may scratch the floor on the pads.
- Vacuum using fine dust filter: It is a vacuum that is meant to collect fine dust. It will assist in the cleanliness of the air. It stops scratches by remaining particles.
- Microfiber mop and bucket: Microfiber mop picks the fine dust up without scratching. The bucket helps with damp mopping during cleaning stages.
Polishing Equipment
- Concrete polisher or floor buffer: This machine is the main tool for polishing. It holds the diamond pads and runs at the speed needed to smooth the surface.
- Diamond polishing pads: There are a variety of polishing pad grit sizes (coarse 100 grit to very fine 3000 grit). You need them all to move step by step and build a glossy finish.
- Grit levels: Low grits (100 -200): Low grits are used to remove scratches. Surface is polished by medium grits (400- 800). The final mirror-like shine is obtained with high grits (1500-3000).
Chemicals & Sealers
- pH-neutral cleaner: This cleaner is safe for stained concrete and prevents color damage. Strong cleaners like bleach or vinegar must be avoided.
- Polishing compound: Some polishing systems use compounds to help smooth the surface further. They also add shine.
- Water based sealer or stain guard: This sealer holds in the stain and it will not allow spills to soak in. It is also a fading protection. Options that use water offer less risk in the house and produce less odor. Use less odor.
Safety Gear
- Gloves: To make sure your skin does not touch chemicals and dust.
- Respirator/mask: Grinding and polishing is a dust-giver.
- Safety glasses: Use to keep off dust and small flying particles that can harm your eyes.
- Knee pads: Knee pads save strain and injury whilst on the floor because polishing takes time.
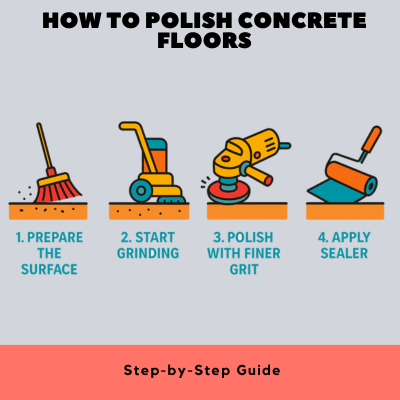
Step-by-Step Guide: How to Polish a Stained Concrete Floor

Now let us have step-by-step guidance for polishing as below:
Step 1. Preparation
De-furnish the area and get rid of furniture, rugs and footballs. This will not damage the floor as it makes it fully accessible. Broom and then vacuum, to remove dust.
Clean the stains with neutral cleaner.
Step 2. Initial Cleaning
Mop the floor with a pH-neutral cleaner mixed with water. Sectors and pay in the same direction the whole ground. Wipe the floor with clean water to clear residue and leave it to dry.
When there is a presence of moisture, the polishing pads might not be efficient. Similarly, sealers might not bond.
Step 3. Grinding (If needed)
Not every floor need grinding. And when yours is scratched or dark at points, or patchy, start coarse grit pads. When it is ground it eliminates flaws and cleanses the surface.
Turn dust reduction and wet polishing or a HEPA filter vacuum constantly. One should not over- grind, which can take too much of the stain away.
Step 4. Polishing in Stages
Begin on pads of lower grit (100200 grit) to slick scratches. Rechange to middle pads (400 to 800 grit) to polish the surface and impart smoothness.
Lastly, apply high-grit pads (1500 3000 grit) to create a reflective shiny surface. It is best to make the surface a little damp to minimize dust. After every stage vacuum carefully and then change the grit.
Step 5. Applying a Sealer or Polish Guard
Once the polishing is pre-empted, it is critical to seal. A sealer, which is made of water, guards the stain without altering its color. Use in a thin layer a microfiber applicator, clean the floor with straight strokes.
Allow the initial application to occur and then apply the second. A good sealer would stop the spills form stains and make the floor look new.
Step 6. Buffing to Shine
Once sealed, use a high-speed burnisher to finish the job. Buffing adds depth to the color and is more reflective. This final shoemaking makes a plain polishes floor into a reflection floor.
Special Considerations for Stained Concrete

There are some special points to consider while you are handling stained concrete. Some of them are as below:
- Acid-stained floors: The floors are delicate. Do not use alkaline or soaping cleaners because they may damage the chemical bond. It creates the marbled effect. Always only neutral cleaners and soft pads.
- Water-stained floors: The stained floors might be faster in fading when unprotected. Use as a reread after some time to keep them shiny and lush.
- Maintaining Vibrancy: It is always best to test a little part then polish. Violent grinding or inappropriate chemicals may make the stain light. However, it may permanently alter the stain.
Maintenance After Polishing

Once you polish a stained concrete floor, it is important to maintain it as:
- Daily: Spray a microfiber dust mop, remove grit. Pieces of dirt are like sandpaper and dull the shine. Entry mats at doors also help keep grit outside.
- Weekly: Wipe down with an odorless cleansing agent. Avoid strong soaps or oils. Wipe a finger under the water.
- Quarterly: Renew the finishing by touching-up. It gives it an additional protection layer and convenient cleaning.
- Every 1 to 2 years: Recoat spots with high traffic such as corridors or kitchens. Resealing eliminates wear, and preserves color.
Common Mistakes to Avoid

The following things must be avoided:
- Applying intense cleaners: The stain can be taken off with bleach, ammonia and vinegar. They can also damage the sealer. Stick to neutral cleaners made for concrete.
- Skipping grit stages: Moving too quickly through pad levels leaves scratches behind. The consequence is a pin-thievery floor. Always go step by step.
- Over-wetting of the floor: When it is excessive during polishing the mixture of water is forming a slurry. It gets in the pads of the floor finishing giving them clogging qualities. Clear-cut water stands can blunt it. Use controlled dampening only.
- Not sealing after polishing: A polished but unsealed floor will lose its gloss quickly. It will absorb stains. Sealing locks in the finish.
DIY vs. Professional Polishing: Which Should You Choose

The question of choosing DIY or professional polishing can be decided by considering:
- Small-scale polishing: This will be good at the smaller space such as a garage, patio or single room. It is economical to rent machines and pads. It is cost-efficient in its use of labor, it takes patience and detail, but saves money.
- Professional polishing: This is applicable in large, damaged and commercial floor polishing. Pros have heavy planetary grinders, industrial sealers and dust-vents. They are more rapid and give commence able outputs.
- Costs comparison: DIY can be as costly as several hundreds of Dollars of rental and supplies. The price of professional service may run a few dollars a square foot. But pro work ensures consistency, gloss measurement, and durability
Environmental & Safety Tips

As the environmental and safety aspects are important for any work. Here you can find some tips.
- Green materials: Select water-based cleaners and sealers. They are low in odor and include fewer chemicals. They make them safer to people and pets.
- Ventilation: It is imperative to have windows open and fans running. Moreover, the proper air circulation can reduce vapor and drying becomes quicker.
Personal protection: Personal PPEs (gloves, safety glasses and respirator) are important. As silica dust is produced during the grinding and it is dangerous when inhaled.
- Disposal: You can dispose of the polishing slurry and wastewater by collecting it. Allow to dry after which dispose in a safe manner. Do not discard it in drain or soil.
FAQs
Can you polish stained concrete without grinding?
Yes, if the floor is smooth and not damaged. Start with medium grit pads to refine the surface.
How often should stained concrete floors be polished?
For homes, every 2–3 years is enough. Busy areas may need yearly touch-ups.
Will polishing remove or fade the stain?
Polishing alone will not. However, heavy grinding can expose the layers. Similarly, the color can get light.
What’s the difference between polishing and waxing concrete?
Polishing refines the concrete itself with diamonds. Waxing adds a thin coat on top, which wears off quickly.
Conclusion
Stained concrete floors are shiny when polished. Besides, it hardens the surface, and shields the stain. It enhances appearance and length of life. Follow the above-mentioned steps such as prepare well, polish in stages, seal, and buff.
Always maintain the concrete surface with regular cleaning and resealing. Protect the surface from harsh chemicals. R personnel polishing achieves mini space work. Large floors, or those much used, are worth having the work of a professional.
A polished stained concrete floor will remain beautiful with the proper care. More than that, it will last decades.


Leave A Comment